So, I have had this Classic Greek Cooking book by Daphne Metaxas forever. In fact it was published in 1974 and is no longer in print (although you can get it used in a variety of places). My copy is falling apart. The back cover is totally gone and there are stains throughout the book. Simple Greek cooking and many recipes that are easily made.
One recipe I make over and over and over, and is a big family hit, is Chicken Avgolemono. Right now I have a surplus of lemons. My husband picked about 10 pounds yesterday, from which I zested, peeled, and juiced. I also made some lemon vodka for use in lemon drops sometime down the line and a lemon/garlic salad dressing for use this week. But I am not anywhere near using the current crop. Tea got a bagful when she was here a week ago, so she might want a few more. Brilliant daughter loves to make lemon bars, so she can use a few. And I have a dessert to make for a baby shower on Thursday at my hubby’s work, so I can be creative with lemons there. But that won’t take even half of what we have sitting in the kitchen. So I think harder, and remember…this simple stew. I think you will like it.
Chicken – you can use a cut-up fryer, or boneless thighs (with skin on)
2 T olive oil
1 c chicken broth
1 T dry or ¼ c fresh dill weed
salt/pepper to taste
2 diced potatoes or 2 cans whole white baby potatoes, drained
2 eggs
2 lemons, juiced
2 T cornstarch
In large stew pot or Dutch oven, brown chicken in oil. Turn skin side up. Add broth, 1 cup water, dill, and salt and pepper. Bring to a boil. Cover and simmer for 35 minutes. Add potatoes and continue simmering until potatoes are tender.
Mix lemon juice with cornstarch. Beat eggs and mix in with lemon juice. Slowly pour into chicken mixture, stirring as you pour. Cook until thickened. Serve immediately.
This takes about an hour from start to finish. You can make it over the weekend and serve it during the week. It also freezes well so you can make a double batch and freeze half for a rainy day.
Serve with salad or veggie and some bread to mop up the sauce and you are good to go.
Enjoy!
Wednesday, January 10, 2007
Monday, January 08, 2007
A visual taste treat
My nephew, who has been working in restaurant kitchens since the age of 15, left his home in Colorado Springs last June for Germany for his seven-year stint in Europe’s Master Chef Program. Born in Germany, and having lived there for the first decade of his life, he is fortunate to be completely bilingual and very comfortable in his birthplace. He flew over to Germany prior to high school graduation for interviews and internship possibilities. Needless to say, we were all thrilled that he chose this path, the foodie family that we are.
While he was able to make a very quick trip home over the holidays (and almost got stuck in Denver due to the snowstorm), he had to return to Germany to school, internship, and to prepare for the upcoming pastry competition that he will be participating in. His proud parents sent us a few pictures of the dishes he is working on, which made my mouth water. I thought I would share them with you.
Best of luck to you, Ryan!



While he was able to make a very quick trip home over the holidays (and almost got stuck in Denver due to the snowstorm), he had to return to Germany to school, internship, and to prepare for the upcoming pastry competition that he will be participating in. His proud parents sent us a few pictures of the dishes he is working on, which made my mouth water. I thought I would share them with you.
Best of luck to you, Ryan!



Friday, January 05, 2007
Kitchen Collaboration with Butcher Son
Butcher son and I attempted our first sausage recently. I have never made sausage before and surfed the web and did considerable reading to get a handle on the process and to find an interesting recipe. There are a lot of simple sites out there that help you feel okay about being a novice sausagemaker, which I definitely am. Butcher son works at Schaub’s Meat and Poultry that regularly offers 16 kinds of house-made sausage each day (flavors vary on the season), so he has been involved in the process, and kindly brought home the sausage casings required to produce our proud product.
We did have a bit of a debate on what kind of sausage to make, and how to exactly go about it. Butcher son wanted to make chicken-apple sausage, but I believe that this would have been the more difficult road. Sausage requires fat, and chicken traditionally does not have much fat and can produce a drier sausage. I wanted to stick to a pork-based sausage to begin with, and to ease into the process, and since I was paying, I won out. Then there was the debate on whether I should grind my own pork or use ground pork. Actually, this was more of a debate with myself. I purchased both, since I was sitting on the fence about it. When it came time to making the sausage, I went with the pre-ground pork, as I had already made 3 batches of cinnamon rolls (traditional, orange, and chai) and 40 beef tamales. I was a bit tired, and opted for the easier version this time around. (But the large pork butt, or was it shoulder?, went into the freezer for the next batch.)
I narrowed down the types of sausage to make to three, and finally decided on chaurice. Why the chaurice? Well, first I don’t think I’ve ever had it, so I wouldn’t know if I did it wrong. Secondly, I had all the ingredients. Third, it looked pretty easy. So what is chaurice? Depending on where you look, it is either Cajun or Creole in origin, an old-time recipe dating to the 19th century. Possibly adapted from Spanish settlers in Louisiana to resemble their homeland’s chorizo. They serve it with white or red beans, or for breakfast.
I found several recipes, so I compromised and made up my own version based on what I was reading.
Chaurice
1 pound ground pork
½ T coarse salt
¼ t cayenne
1/8 t cinnamon
1/8 t ground cloves
1/3 t thyme
3 ground bay leaves
1 T Creole Seasoning
1 garlic clove, crushed
5 T diced onions
1 T chopped parsley
1 t crushed red pepper flakes
1/3 cup water
Medium hog casings
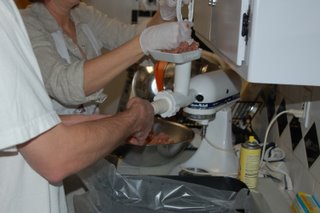
Take the salt, cayenne, cinnamon, cloves, thyme, bay leaves, and Creole Seasoning and place in spice or coffee grinder. Pulse to powder consistency. Place meat, spices, and remaining ingredients into a large bowl and mix well by hand until thoroughly combined.
Ingredients: All of these ingredients are easy to find.
Ease: Making up the sausage is easy. If you don’t want to stuff it into links, it can be used as patties or fried up and crumbled into some tasty red beans. Stuffing into casings does require 2 people: a stuffer and a casing handler, and some time and patience, as most of us do not have an industrial stuffer which speeds things along.
Special Equipment: To make links, you will need a sausage stuffing mechanism. I have a food grinder attachment for my Kitchen Aid mixer, for which I bought the sausage stuffing attachment ($9.95).
This recipe can be doubled, tripled, etc. We used 3 pounds of sausage, which yielded 13 good –sized links.
So how did it turn out? The end product held up to the cooking process very well. It retained its shape, had good color, and browned evenly. Overall, we were very pleased. It had a really nice flavor, with a hint of fire. I could definitely tell there was cloves in the batch, even though it was a very small amount. I would be tempted to leave this ingredient out next time. The cayenne and Creole Seasoning gave it some bite. It wasn’t greasy at all, in fact, it was borderline needing more fat. But it’s probably healthier this way, and would vary depending on the type of pork you use and how much fat there was to begin with.
We are considering this a success, which is a miracle for the first time around. Butcher son wants to know what kind of sausage we would be making next time…. Guess we’ll just have to wait and see.
We did have a bit of a debate on what kind of sausage to make, and how to exactly go about it. Butcher son wanted to make chicken-apple sausage, but I believe that this would have been the more difficult road. Sausage requires fat, and chicken traditionally does not have much fat and can produce a drier sausage. I wanted to stick to a pork-based sausage to begin with, and to ease into the process, and since I was paying, I won out. Then there was the debate on whether I should grind my own pork or use ground pork. Actually, this was more of a debate with myself. I purchased both, since I was sitting on the fence about it. When it came time to making the sausage, I went with the pre-ground pork, as I had already made 3 batches of cinnamon rolls (traditional, orange, and chai) and 40 beef tamales. I was a bit tired, and opted for the easier version this time around. (But the large pork butt, or was it shoulder?, went into the freezer for the next batch.)
I narrowed down the types of sausage to make to three, and finally decided on chaurice. Why the chaurice? Well, first I don’t think I’ve ever had it, so I wouldn’t know if I did it wrong. Secondly, I had all the ingredients. Third, it looked pretty easy. So what is chaurice? Depending on where you look, it is either Cajun or Creole in origin, an old-time recipe dating to the 19th century. Possibly adapted from Spanish settlers in Louisiana to resemble their homeland’s chorizo. They serve it with white or red beans, or for breakfast.
I found several recipes, so I compromised and made up my own version based on what I was reading.
Chaurice
1 pound ground pork
½ T coarse salt
¼ t cayenne
1/8 t cinnamon
1/8 t ground cloves
1/3 t thyme
3 ground bay leaves
1 T Creole Seasoning
1 garlic clove, crushed
5 T diced onions
1 T chopped parsley
1 t crushed red pepper flakes
1/3 cup water
Medium hog casings

Take the salt, cayenne, cinnamon, cloves, thyme, bay leaves, and Creole Seasoning and place in spice or coffee grinder. Pulse to powder consistency. Place meat, spices, and remaining ingredients into a large bowl and mix well by hand until thoroughly combined.
Ingredients: All of these ingredients are easy to find.
Ease: Making up the sausage is easy. If you don’t want to stuff it into links, it can be used as patties or fried up and crumbled into some tasty red beans. Stuffing into casings does require 2 people: a stuffer and a casing handler, and some time and patience, as most of us do not have an industrial stuffer which speeds things along.

Special Equipment: To make links, you will need a sausage stuffing mechanism. I have a food grinder attachment for my Kitchen Aid mixer, for which I bought the sausage stuffing attachment ($9.95).

This recipe can be doubled, tripled, etc. We used 3 pounds of sausage, which yielded 13 good –sized links.

So how did it turn out? The end product held up to the cooking process very well. It retained its shape, had good color, and browned evenly. Overall, we were very pleased. It had a really nice flavor, with a hint of fire. I could definitely tell there was cloves in the batch, even though it was a very small amount. I would be tempted to leave this ingredient out next time. The cayenne and Creole Seasoning gave it some bite. It wasn’t greasy at all, in fact, it was borderline needing more fat. But it’s probably healthier this way, and would vary depending on the type of pork you use and how much fat there was to begin with.

We are considering this a success, which is a miracle for the first time around. Butcher son wants to know what kind of sausage we would be making next time…. Guess we’ll just have to wait and see.
Wednesday, January 03, 2007
Cinnamon Rolls X Three
Why do something once, when you can do it better three times? I know my favorite chef, Michael Mina, likes to do things in threes (and Butcher son got me Mina’s recent cookbook for Christmas to drool over and challenge me in the kitchen). My daughter insists on wall hangings be in threes. I have three children. So, three is good. And three types of cinnamon rolls are even better.
Wait…before you give up reading this post because you think it will be too hard and too involved, please don’t. I have found you a shortcut, so that you, too, can enjoy threes. So have a little patience and a little faith, and your reward will be three-plus dozen cinnamon rolls that will disappear within a 24-hour span!
My mother-in-law showed me this trick years ago and I almost forgot. But perusing the freezer section the other day, I noticed that frozen bread dough was on sale, and it was calling my name. Three loaves of dough nestled into a Styrofoam container, wrapped in plastic, just waiting for me to take it home and have my way with it. (What was I thinking only buying one package?)
Anyway, the homemade dough recipe that my mother-in-law gave me 25 years ago is still the family favorite, but if they have to make a choice between no cinnamon rolls or rolls with frozen bread dough, they will choose the frozen dough every time. And it works quite well and tastes just fine, so there is no shame in it.
I just thaw the dough, per the package instructions, and get to work. I made traditional cinnamon rolls, orange rolls, and chai-spiced rolls.
You will need:
3 loaves defrosted dough
3 cubes butter (no margarine!)
2 cups white sugar
2 cups brown sugar
3-4 T cinnamon
¼ teaspoon each of: ground cardamom, cloves, allspice, ginger
zest of 1 orange
3 T orange juice concentrate, softened
Before beginning:
Melt butter
Combine sugars and cinnamon in one bowl, mixing well to incorporate
(1) Cinnamon Rolls
Flour your counter or pastry board and place one defrosted loaf in the middle, dusting with flour. Roll out with a rolling pin as thin as possible. Brush melted butter over the dough, using about ½ cup. Sprinkle liberally with sugar/cinnamon mixture. (If you want to add chopped walnuts or pecans, or even raisins—yuck—now is the time to do it.) Roll up gently, and cut into 1 – 1 ½-inch lengths. Place in round or square pan, but do now crowd. Press down slightly, cover with tea towel, and let rise for 30-45 minutes, until half again as big.

(2) Orange Rolls
Flour your counter or pastry board and place one defrosted loaf in the middle, dusting with flour. Roll out with a rolling pin as thin as possible. Brush softened orange concentrate on dough, topping with the melted butter, using about 1/3 cup. Sprinkle orange zest over dough, following with with sugar/cinnamon mixture. Roll up gently, and cut into 1 – 1 ½-inch lengths. Place in round or square pan, but do now crowd. Press down slightly, cover with tea towel, and let rise for 30-45 minutes, until half again as big.

(3) Chai-spiced Rolls
Flour your counter or pastry board and place one defrosted loaf in the middle, dusting with flour. Roll out with a rolling pin as thin as possible. Brush melted butter over the dough, using about ½ cup. Add cardamom, cloves, allspice and ginger to remaining sugar mixture. Sprinkle liberally over the dough. Roll up gently, and cut into 1 – 1 ½-inch lengths. Place in round or square pan, but do now crowd. Press down slightly, cover with tea towel, and let rise for 30-45 minutes, until half again as big.
Bake at 375 degrees for 20-25 minutes. Test by pulling out center piece of dough and making sure it is cooked.
Let cool and indulge!
Wait…before you give up reading this post because you think it will be too hard and too involved, please don’t. I have found you a shortcut, so that you, too, can enjoy threes. So have a little patience and a little faith, and your reward will be three-plus dozen cinnamon rolls that will disappear within a 24-hour span!
My mother-in-law showed me this trick years ago and I almost forgot. But perusing the freezer section the other day, I noticed that frozen bread dough was on sale, and it was calling my name. Three loaves of dough nestled into a Styrofoam container, wrapped in plastic, just waiting for me to take it home and have my way with it. (What was I thinking only buying one package?)
Anyway, the homemade dough recipe that my mother-in-law gave me 25 years ago is still the family favorite, but if they have to make a choice between no cinnamon rolls or rolls with frozen bread dough, they will choose the frozen dough every time. And it works quite well and tastes just fine, so there is no shame in it.
I just thaw the dough, per the package instructions, and get to work. I made traditional cinnamon rolls, orange rolls, and chai-spiced rolls.
You will need:
3 loaves defrosted dough
3 cubes butter (no margarine!)
2 cups white sugar
2 cups brown sugar
3-4 T cinnamon
¼ teaspoon each of: ground cardamom, cloves, allspice, ginger
zest of 1 orange
3 T orange juice concentrate, softened
Before beginning:
Melt butter
Combine sugars and cinnamon in one bowl, mixing well to incorporate
(1) Cinnamon Rolls
Flour your counter or pastry board and place one defrosted loaf in the middle, dusting with flour. Roll out with a rolling pin as thin as possible. Brush melted butter over the dough, using about ½ cup. Sprinkle liberally with sugar/cinnamon mixture. (If you want to add chopped walnuts or pecans, or even raisins—yuck—now is the time to do it.) Roll up gently, and cut into 1 – 1 ½-inch lengths. Place in round or square pan, but do now crowd. Press down slightly, cover with tea towel, and let rise for 30-45 minutes, until half again as big.

(2) Orange Rolls
Flour your counter or pastry board and place one defrosted loaf in the middle, dusting with flour. Roll out with a rolling pin as thin as possible. Brush softened orange concentrate on dough, topping with the melted butter, using about 1/3 cup. Sprinkle orange zest over dough, following with with sugar/cinnamon mixture. Roll up gently, and cut into 1 – 1 ½-inch lengths. Place in round or square pan, but do now crowd. Press down slightly, cover with tea towel, and let rise for 30-45 minutes, until half again as big.

(3) Chai-spiced Rolls
Flour your counter or pastry board and place one defrosted loaf in the middle, dusting with flour. Roll out with a rolling pin as thin as possible. Brush melted butter over the dough, using about ½ cup. Add cardamom, cloves, allspice and ginger to remaining sugar mixture. Sprinkle liberally over the dough. Roll up gently, and cut into 1 – 1 ½-inch lengths. Place in round or square pan, but do now crowd. Press down slightly, cover with tea towel, and let rise for 30-45 minutes, until half again as big.
Bake at 375 degrees for 20-25 minutes. Test by pulling out center piece of dough and making sure it is cooked.
Let cool and indulge!
Tuesday, January 02, 2007
Easy Appetizer
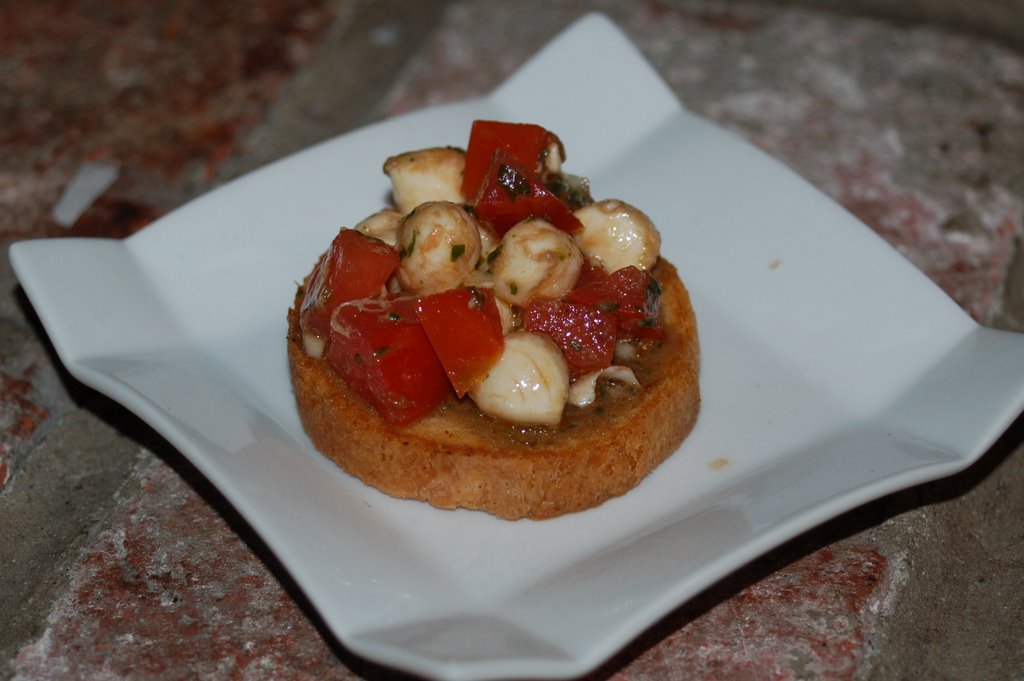
Brilliant daughter has been making us a wonderful, quickie appetizer that I thought I would share. We had it on New Year’s eve and I was a reminded of what a winner it is. She may have actually gotten the recipe from one of her London flatmates, but since she brought it to us, I will give her all the credit.
Perlini Bruschetta
1 tub of fresh mozzarella perlini (available at Trader Joes)
3 roma tomatoes, seeded and finely chopped
1 small handful of fresh basil leaves, chopped or chiffonade
1 clove garlic, finely chopped
1/4 cup good quality balsamic
2 T olive oil
salt and fresh-ground pepper to taste
Mix all together and let marinate for several hours (if you can stand it). Serve with fresh or toasted baguette slices.
You can add more or less of everything, based on your preferences and tastes. It shouldn’t be too liquidy, but have enough that can seep in and flavor the perlini.
I also find that if I have any leftover, I throw it in at the end of scrambling eggs, which slightly melts the cheese and warms the tomatoes. I also threw it in some mini-frittatas I made, and I imagine it might be quite good tossed in at the end of a creamy risotto. Use your imagination – waste not, want not….
Brilliant daughter eating aforementioned appetizer:

and yes, the fire is real!
Lemons are arriving daily!
Better late than never, I say. Normally, our lemon crop is in much earlier than this, but for some strange reason, we have had a 3-4 week delay this year. I remember last year making limoncello and lemon curd in November, but this year, only daughter got in a batch of lemon curd at the 11th hour. So no lemon holiday presents or food this year. Drats….
 The bushes are heavy with lemons, as you can see, and we are picking them at a fast clip, every few days. I have donated some to Tea, who is hooked on some sort of green lemonade that she can’t get enough of, brought some to co-workers, and have been using them in cooking whenever I can. Oh, and I am making the best lemon drops! No, not the hard candies, but the alcoholic drink served in a martini glass. Of course, you want a recipe, but I really don’t have one. Lemons vary in their taste and sweetness, so it can be a bit of a guessing game. But the basics are thus:
Squeeze and strain lemon juice into a pitcher, add sugar and muddle/mix until the sugar is fully incorporated (you can use granulated or powdered). Taste – it should be sweet but still a bit tart. Once you have it adjusted properly, add equal amounts of vodka and some ice. Stir the heck out of it, to chill the liquid. I pop in some of Safeway’s Clear (sugar-free) Lemon Sparkling Water and strain into a martini glass. I, personally, like to rim the martini glass with yellow sugar (the fine granulated kind that you use on cupcakes). I just rub a bit of lemon around the edge of the glass and roll in the sugar.
Enjoy!
 The bushes are heavy with lemons, as you can see, and we are picking them at a fast clip, every few days. I have donated some to Tea, who is hooked on some sort of green lemonade that she can’t get enough of, brought some to co-workers, and have been using them in cooking whenever I can. Oh, and I am making the best lemon drops! No, not the hard candies, but the alcoholic drink served in a martini glass. Of course, you want a recipe, but I really don’t have one. Lemons vary in their taste and sweetness, so it can be a bit of a guessing game. But the basics are thus:
 Squeeze and strain lemon juice into a pitcher, add sugar and muddle/mix until the sugar is fully incorporated (you can use granulated or powdered). Taste – it should be sweet but still a bit tart. Once you have it adjusted properly, add equal amounts of vodka and some ice. Stir the heck out of it, to chill the liquid. I pop in some of Safeway’s Clear (sugar-free) Lemon Sparkling Water and strain into a martini glass. I, personally, like to rim the martini glass with yellow sugar (the fine granulated kind that you use on cupcakes). I just rub a bit of lemon around the edge of the glass and roll in the sugar.
Enjoy!
Subscribe to:
Posts (Atom)