Wednesday, August 22, 2012

Summertime Ceviche


We love, love, love ceviche and it’s a great summertime staple. Fresh, healthy, low in fat and calories, it’s a great appetizer and can be served with tortilla chips, atop a crispy tortilla, or in a fancy schmacy martini glass as we did this week.

It’s a perfectly acceptable diet food and fits in well on the whole foods diet I am trying to maintain. Full of bright flavors from lime, cilantro and peppers, it only takes a few minutes to make (and then several hours to marinate). Most of the effort is in the chopping of ingredients, but it is well worth it. 


I just assemble all the ingredients, spend a little time with my knife and a chopping board, and pour it all into a large, non-reactive bowl. A few hours in the refrigerator and you have a tasty treat. So what are you waiting for?


Mrs. B’s Ceviche

½ pound bay scallops, diced
½ pound raw, peeled and deveined shrimp
½ cup red onion, minced
2 peppers, seeded and diced (jalapenos, pasilla, Anaheim)
3 Roma tomatoes, seeded and diced
2 garlic cloves, minced
½ cup chopped cilantro
8 ounces fresh lime juice (approx. 8 limes)

Mix all ingredients in non-reactive bowl (ceramic, glass, plastic). Cover with lid or plastic wrap and refrigerate for 4+ hours, stirring occasionally.

Yield: 4-6 servings


Monday, August 20, 2012

Getting Back on Track with a Healthy Diet


Sometimes life gets in the way. I’ve been neglecting a lot these days, probably from an overdose of obligations that took me in unexpected directions or maybe from a lack of focus. I don’t know, and it really doesn’t matter to me why. What does matter is that I need to get back on track, take more control of my life, and particularly my health.

I find myself pulled in too many directions, not able to settle on specific tasks at hand; not a good thing when you’ve started a new job. So I need to buckle down and concentrate on the things that matter. So in addition to working again, I need to find the time to exercise and return to a healthier eating regimen. Not that I’ve been dining on pizza, burgers, and processed junk food, but I also have not been getting my allotted fruits and veggies (despite my healthy backyard garden). So in an attempt to rectify, I have borrowed Brilliant Daughter’s juicer and stocked up on a glorious bounty of fruits and vegetables.

I’m going to make my body happier and healthier with what I call a whole foods diet. That doesn’t mean that I only shop at Whole Foods, it just means that the food is unprocessed, fresh, lean, and healthy. You know, fruits and veggies, whole grains and legumes, lean proteins. Cut out the processed crap, sugar, and a fair amount of dairy. It takes a bit of thinking and preparation, not to mention cost, but if I can reconnect with all these good foods on a regular basis, then I can slowly introduce some whole grain breads, some cheese, and the occasional sweet treat and end up with a more balanced diet.

My first stop was Sigona’s, our local greengrocer. You can find just about any kind of fruit or veg here, and I loaded up the cart, walking out $100 lighter. In fact, I had a hard time finding room in the fridge or on the counter for all I bought. But it brings a smile to my face seeing all the good fresh fruit (and makes me want to go on another canning binge!).

The goal is to have freshly pressed juice every morning, occasionally made into a smoothie with some nonfat plain Greek yogurt. For lunch, another glass of juice and a whole foods salad of some kind. Dinner will be grilled, poached or roasted lean protein (fish/seafood, poultry, beef filet) or grain-legume combo (brown rice and beans), along with vegetables.  I’ve got some nice fresh fruit and raw almonds for snacks, and some home-brewed decaf and herbal iced tea to sip on. I’m not giving up my morning coffee and see no need to.

Today’s breakfast concoction consisted of a mixture of blueberries, kiwi, apples and pear. Blueberries have a very high antioxidant component, kiwi contains a high level of vitamin C and potassium, apples have high levels of polyphenols that contribute to their antioxidant capabilities, and pears bring a nice sweetness and mellowness to this breakfast cocktail. It was quite a tasty beverage, if I do say so myself.

I have also purchased a Tuscan melon, grapes, papaya, mango, pineapple, oranges, bananas, ginger and limes, and have strawberries from the garden. I can also add in coconut water, almond milk, or the yogurt for variation. I also bought celery, carrots, kale and avocado for more savory drinks, and can pull beets and chard from the garden. (Too bad I don’t like cucumbers, because I have an overabundance of lemon cucumbers in the garden that could easily be used in a veggie juice. )

Today for lunch I made what is labeled a Superfood Salad. The recipe is pretty easy to make and makes 4 one-cup servings. It has a base of quinoa, with onion, avocados, black beans, fresh corn, orange, cilantro and pomegranate arils (seeds) and is tossed with a lemon vinaigrette (from my own Meyer lemons). I whipped it up and divided the salad into four Tupperware containers for lunches. (Both Butcher Son’s girlfriend and Mr. B will be taste testers.) My daughter has eaten this with poached prawns, and I think you could also add grilled fish or chicken if you wanted the extra protein. And it’s something even kids should like, not to mention it is a pretty salad, full of color and flavor.


Superfood Salad

1/2 cup dry quinoa
1/3 cup red onion, chopped
1 orange, peeled and segments chopped
1 avocado, chopped
1 cup canned black beans, rinsed and drained
1 cup pomegranate arils (about 1 pomegranate worth)
1 cup fresh corn kernals (can use thawed frozen as well)
1/3 cup cilantro, chopped
salt & pepper

Lemon Vinaigrette:
¼ cup lemon juice
2 garlic cloves, microplaned or finely minced
dash of sweetener (agave nectar, stevia or white sugar)
salt & pepper
6 Tablespoons extra virgin olive oil

Cook quinoa according to package directions. Set aside to cool.

Make lemon vinaigrette by combining all ingredients in a jar with a tight-fitting lid. Shake to combine.

Assemble remaining salad ingredients in a large bow. Add quinoa once cooled. Toss gently.
Reshake vinaigrette and pour over the salad. Stir to combine.

Refrigerate and eat within 48 hours.


Tuesday, June 12, 2012

The Taste of Summer: Simple Strawberry Cake


When it comes to food there are few things I like more than strawberries. During my college years I worked for Carriage House, a cannery in San Jose that my godmother’s family owned. Their bread and butter, so to speak, was jams, jellies, peanut butter and pie fillings. I loved working on the days they were running strawberry jam; the scent heavy in the air made my workday all that more pleasant.

Because of my love of strawberries, we planted several varieties in our raised beds last year and since early May, they have been producing some really yummy berries. Often when I harvest the garden, they don’t even make into the house; they go no further than my mouth. But I was able to save enough this week to make a very simple strawberry cake, one that has a dense base with halved berries covering the top. Quick to make and served with a dollop of sweetened whipped cream, it is a delicious dessert, sure to please everyone.

This recipe, which originated with Martha Stewart, does not require any special ingredients and reminds me a bit of clafouti, although without sooooooo much butter. Using really ripe berries, they will almost melt into the cake like jam; firmer berries will retain their shape but soften up nicely. And although I have yet to try it, I think this cake would be really good with any type of berry.


Simple Strawberry Cake

6 tablespoons unsalted butter, room temperature
1 1/2 cups all-purpose flour
1 1/2 teaspoons baking powder
1/2 teaspoon salt
1 cup plus 2 tablespoons granulated sugar
1 large egg
1/2 cup milk
1 teaspoon vanilla extract
1 pound strawberries, hulled and halved

Preheat oven to 350°F. Butter a standard 10-inch pie pan, deep-dish 9-inch pie pan, or 9-inch springform pan. (I used a fancy quiche pan.)

Whisk flour, baking powder and salt together in a small bowl. In a larger bowl, beat butter and 1 cup sugar until pale and fluffy with an electric mixer, about 3 minutes. Mix in egg, milk and vanilla until just combined. Add dry mixture gradually, mixing until just smooth.

Pour into prepared pie plate. Arrange strawberries, cut side down, on top of batter, as closely as possible in a single layer. Sprinkle remaining 2 tablespoons sugar over berries.

Bake cake for 10 minutes then reduce oven temperature to 325°F and bake cake until golden brown and a tester comes out free of wet batter, about 50 minutes to 60 minutes. Let cool in pan on a rack.

Serves 8

Tuesday, June 05, 2012

Pork Belly to Pancetta: Taste in the Making


I’m no stranger to pork belly. Butcher Son regularly brings me home slabs to turn into bacon, which I happily do. I’ve experimented with various rubs: brown sugar, molasses, pepper. I’ve smoked the slabs in a converted Weber and an electric smoker, and used several species of wood chips. But I have never attempted to make anything harder with that pork belly than bacon. Until now….

I decided I wanted to try to make pancetta. I read up on the process in several books I own, and finally chose to follow the directions in Charcuterie, The Craft of Salting, Smoking and Curing by Michael Ruhlman and Brian Polcyn. Then Butcher Son brought me home two 10-pound slabs of pork belly. I cut out the choicest 5-pound piece for the pancetta, and cut the rest to make bacon.

After skinning the slab*, I assembled the ingredients for the curing process. The dry cure used for pancetta is different than that which I use for bacon. The recipe called for pink salt. Initially I thought this meant pink Himalayan salt, but after thinking about it for awhile, I began to wonder why such a specific salt was included, so I did some searching and found that “pink salt” is the trade term for “curing salt” and is actually pink. Unfortunately, I couldn’t find it at any local stores and had to send Mr B off to Williams Sonoma to pick up a jar ($9.50).


Once he returned I mixed the pink salt with garlic, salt, brown sugar, fresh ground black pepper, crushed juniper berries, bay leaves, freshly grated nutmeg and sprigs of fresh thyme from the garden. 


After massaging it in vigorously, I vacuum sealed the slab and placed it in the refrigerator. Every other day I took it out, massaged the belly (called overhauling), and put it back in the fridge. 


After 10 days it was firm and considered cured. At this point it was time to rinse, dry, smear with fresh ground pepper and roll that sucker up for the drying process. Butcher Son asked around and got some good tips on rolling and tying, one of which was that if he didn’t end up with blisters, he was doing it wrong. I thought that was a bit extreme, but shame on me for doubting the experts.


The goal when rolling is for the belly to be as tight as possible with no air in the middle. Rolling the belly isn’t the hard part, it’s the tying that requires brute strength. You start in the middle and work your way out, so that there is little to no air between the interior rolls. After the 4th tie, Butcher Son found himself with missing skin off both his pinkies from tying so tightly. Apparently he just skipped the blister stage.


Once the pancetta is rolled and tied it needs to go into a cool humid place. The book suggests between 50 and 60 degrees and 60 percent humidity. We happen to have an old wine refrigerator that works fine, but is noisy as all get-out. We had to remove it from the dining area due to the issue and it now resides in a corner of the garage. So we plugged it in, placed a pan of ice cubes in the bottom and laid the roll on one of the shelves.

Every afternoon (when it was warmest) we dumped the pan of water and added more ice. Every other day we turned it a quarter turn and checked to make sure that the pancetta was not getting too hard and drying out too much. It takes approximately two weeks to dry sufficiently. You may notice small white dots of mold on the end pieces. This is fine, it will be cut off before eating.

What you want is a semi-firm roll. Too hard and you know you’ve gone too long. There is some shrinkage due to the drying process, so the five-pound pork belly you started with will end up being closer to 4 (and a squosh).

I have to tell you it was mighty hard to wait two weeks to taste it. And Butcher Son wanted to wait three! So we compromised. I cut off one dry end and then 1/2 pound to make some pasta carbonara. And we have stowed the pancetta in the wine fridge for one more week. Meanwhile, it looks gorgeous and tasted heavenly in the carbonara dish. (Served with a salad straight out of our garden and fresh artisan bread baked with our own herbs!)

I think I might use a bit more herbs in the initial curing, and definitely use more pepper prior to the rolling process, but as pancetta goes, this is a winner. Can't wait for the next taste test.

*NOTE: Always ask for skinned pork belly – it will make your life sooooo much easier.

Tuesday, May 29, 2012

Blueberry Breakfast Biscuits


Sorry about that title, I just love alliterations. Couldn’t help myself. Anyway, I have been experimenting with a Blueberry Cream Biscuit recipe that I saw in Better Homes and Gardens. It is a new family favorite, not only for breakfast but topped with some additional berries and whipped cream for dessert, or Mr B’s personal favorite, reheated in a bowl and topped with some half-and-half.

These biscuits are quick to make, don’t require any fancy ingredients, and can be served with lemon curd, blueberry jam, or all on their own. What appealed to me was the basic biscuit dough. I have yet to find a good basic biscuit (buttermilk or otherwise) and am constantly on the search. Unfortunately this is more a cross between a biscuit and a scone, but my disappointment was tempered by their delicious flavor.

I have tried the recipe with different spices (nutmeg, cinnamon, ginger), amounts of sugar, both whipping cream and half-and-half, topped off with sugar or not, and different baking times. I’ve come to the consensus that my small alterations to the original recipe improve upon the taste and it got big thumbs up from everyone in the household.

I happen to like a sweeter dough, so I increased the amount of sugar. This makes them perfectly edible on their own, without the need for the original blueberry sauce the recipe called for, or even butter, jam or curd. By sprinkling white or raw sugar over the top, you also get an extra bit of sweetness and crunch.

I also tried to make the recipe with half-and-half, as I was out of cream on one occasion. But the cream is significantly thicker and richer—a bridge between the traditional milk and butter called for in recipes like these. The half-and-half required an additional ½ cup of flour, which diluted the sweetness. Even with the additional flour, the dough was a bit hard to turn, as it was still a bit sticky. The result was a somewhat tough outer biscuit, not as light and fluffy as the cream-based version.

I also found that the baking time of 17 minutes from the original recipe was just too short. It was closer to 22-25 and my oven is well calibrated. Had I turned on the convection it might have been done in 17, but be warned. Taking the biscuits out too early means raw dough in the center.

These take about 5 minutes to make, and with cooking time can be on your table, piping hot, in less than 30. So what are you waiting for?

Blueberry Breakfast Biscuits

2 cups all-purpose flour
2 teaspoons baking powder
4 tablespoons sugar
½ teaspoon salt
¼ teaspoon ginger
1 cup blueberries
¼ cup diced crystallized ginger*
1½ cups whipping cream

Preheat oven to 425 degrees. Line a cookie sheet with parchment paper.

In a large bowl thoroughly mix flour, baking powder, sugar, salt, and ginger. Toss blueberries and crystallized ginger with the flour mixture. Stir whipping cream into the flour mixture until just moistened.
Turn out dough on a floured work surface. Gently lift and fold dough four or five times, making a quarter turn between each fold. Place dough on the cookie sheet forming it into an 8-inch square, approximately 1 inch thick. Using a floured pizza cutter or knife, cut 12 to 16 squares in dough, leaving biscuits intact. 

Bake in upper half of oven for 22-25 minutes. until golden brown. Cut through or pull apart biscuits.

*The Ginger People make baker’s cut crystallized ginger chips, which are perfect for baking recipes (as well as to put in oatmeal, granola, etc). This is what they look like, although they are significantly cheaper (by half) at Cost Plus.

Saturday, May 26, 2012

Going Whole Hog


Well, not really WHOLE hog, just the belly of the beast. Yep, last week we cured, rendered, smoked or ate 20 pounds of pork belly. Now before you get on your high horse about how unhealthy that is, let me tell you that it wasn’t all consumed in one sitting. But I have found that when I am doing anything homemade, more is better. Like canning. Why make 5 jars of jam, when 10 jars are just as easy. Same thing with the belly.

It all began because we ran out of our home-cured bacon. Bacon that we not only enjoyed as a breakfast item, and in soups and other savory dishes, but also in bacon fat caramels. (More about that later.) So it was time to rub some belly and get the smoker out. And because we donated homemade bacon (and a box of those delish bacon caramels) to a fundraiser, more was required. We also share the bounty with Brilliant Daughter and Electrician Son.

So, two 10-pound pork bellies made their way to my kitchen. I cut the choicest 5-pound slab for my first foray into pancetta, for which I will dedicate a whole post to next week. Then I cut four slabs for bacon, and had one small slab leftover that I slow-roasted.

I wrote a post about “Makin Bacon” last year, when we first started making our own. We have since graduated from a repurposed Weber to an electric smoker that belonged to my godfather and is probably 15 years old. It takes a bit less tending and has 3 racks, making the smoking process more efficient and the end result is just as good.

As for the slow-roasted pork belly, I can tell you it’s not for everybody. Butcher Son’s girlfriend doesn’t like fat, and there is definitely a good amount on a belly, so we made it on a night when she wasn’t sitting at the dinner table.

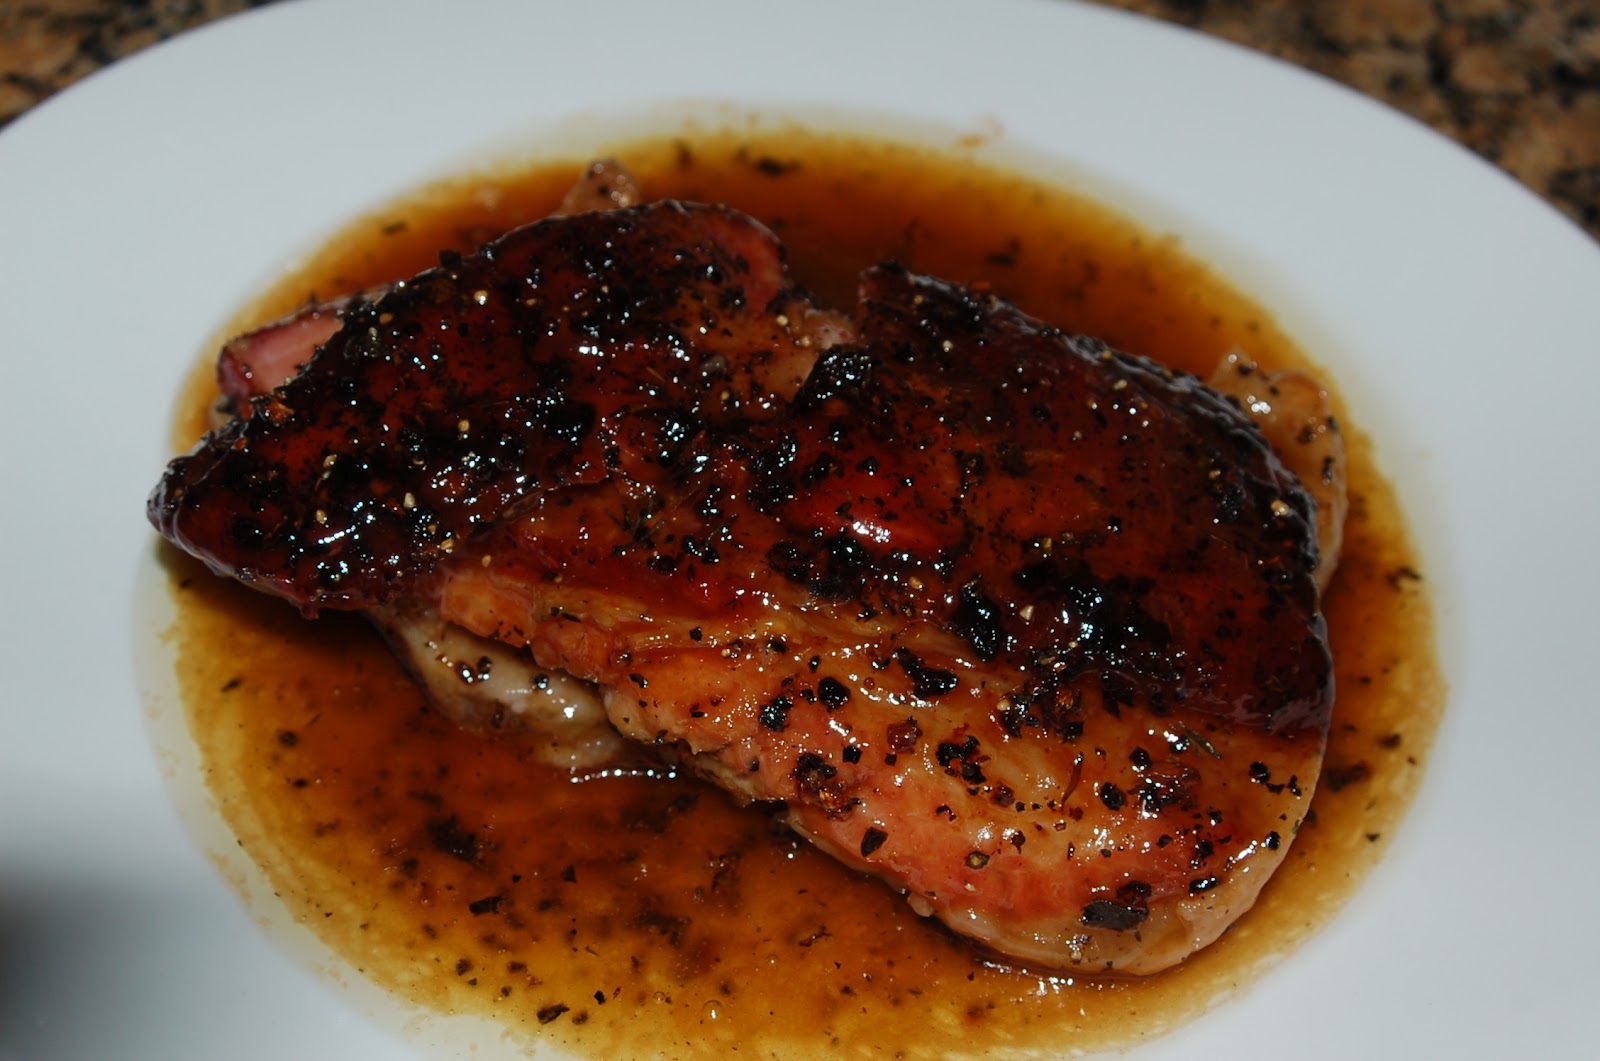
The slow roasting, with nothing more than a few herbs and a finishing glaze, completely changes the texture of the fat. It just melts in your mouth. One caution: you cannot eat much of this and a small 1.5 pound slab feeds 6 easily. It also needs to be served with a starch, like rice, couscous, polenta, potato.

While it takes a significant amount of time to roast pork belly, it is so worth it, and requires no tending. You rub it up, stick it in the oven and voila! Topped with a Makers Mark bourbon glaze and you have one delicious serving of heart-clogging proportions.

I found the recipe on the Maker’s Mark site, which encourages cooking with bourbon, obviously. But the glaze added just the right amount of flavor and complemented the pork perfectly. 


So next time you are feeling adventurous, stop by your local butcher (there is a really cute one at Robert’s of Woodside!), and pick up some pork belly for dinner.

Slow Roasted Pork Belly

1/2 cup Maker’s Mark® Bourbon
2 pounds pork belly, skin on
1 tablespoon kosher salt
1 teaspoon freshly ground white pepper
1 tablespoon fresh sage, minced
1 tablespoon fresh thyme, minced
2 tablespoons garlic, crushed and minced
1/4 cup honey
2 tablespoons sherry or apple cider vinegar
2 tablespoons butter
2 teaspoons kosher salt
1 teaspoon cracked black pepper

Preheat oven to 275°F. Using a sharp knife score the skin of the pork belly in a checkerboard design.

In a bowl combine the salt, pepper, sage, thyme and garlic. Rub the pork belly on both sides with mixture until evenly coated. Place pork belly in a roasting pan skin side up. Place in the oven and bake for 3-1/2 hours, turn oven to broil and cook for 10-12 minutes until the skin puffs up evenly. Remove from oven and let rest for 30-40 minutes at room temperature.

Using a serrated knife, cut the meat into 1/2-inch-thick pieces and reserve.

Place the honey, Maker’s Mark® Bourbon, vinegar, butter, salt and pepper in a large sauté pan. Place over medium high heat and reduce by a third. Place the pieces of crispy pork belly in the pan and increase to high heat. Cook until syrupy and glazes the pork belly. Remove from heat and keep warm.

Plate the meat, drizzling the remaining sauce atop and on the plate.