Tuesday, May 29, 2012

Blueberry Breakfast Biscuits


Sorry about that title, I just love alliterations. Couldn’t help myself. Anyway, I have been experimenting with a Blueberry Cream Biscuit recipe that I saw in Better Homes and Gardens. It is a new family favorite, not only for breakfast but topped with some additional berries and whipped cream for dessert, or Mr B’s personal favorite, reheated in a bowl and topped with some half-and-half.

These biscuits are quick to make, don’t require any fancy ingredients, and can be served with lemon curd, blueberry jam, or all on their own. What appealed to me was the basic biscuit dough. I have yet to find a good basic biscuit (buttermilk or otherwise) and am constantly on the search. Unfortunately this is more a cross between a biscuit and a scone, but my disappointment was tempered by their delicious flavor.

I have tried the recipe with different spices (nutmeg, cinnamon, ginger), amounts of sugar, both whipping cream and half-and-half, topped off with sugar or not, and different baking times. I’ve come to the consensus that my small alterations to the original recipe improve upon the taste and it got big thumbs up from everyone in the household.

I happen to like a sweeter dough, so I increased the amount of sugar. This makes them perfectly edible on their own, without the need for the original blueberry sauce the recipe called for, or even butter, jam or curd. By sprinkling white or raw sugar over the top, you also get an extra bit of sweetness and crunch.

I also tried to make the recipe with half-and-half, as I was out of cream on one occasion. But the cream is significantly thicker and richer—a bridge between the traditional milk and butter called for in recipes like these. The half-and-half required an additional ½ cup of flour, which diluted the sweetness. Even with the additional flour, the dough was a bit hard to turn, as it was still a bit sticky. The result was a somewhat tough outer biscuit, not as light and fluffy as the cream-based version.

I also found that the baking time of 17 minutes from the original recipe was just too short. It was closer to 22-25 and my oven is well calibrated. Had I turned on the convection it might have been done in 17, but be warned. Taking the biscuits out too early means raw dough in the center.

These take about 5 minutes to make, and with cooking time can be on your table, piping hot, in less than 30. So what are you waiting for?

Blueberry Breakfast Biscuits

2 cups all-purpose flour
2 teaspoons baking powder
4 tablespoons sugar
½ teaspoon salt
¼ teaspoon ginger
1 cup blueberries
¼ cup diced crystallized ginger*
1½ cups whipping cream

Preheat oven to 425 degrees. Line a cookie sheet with parchment paper.

In a large bowl thoroughly mix flour, baking powder, sugar, salt, and ginger. Toss blueberries and crystallized ginger with the flour mixture. Stir whipping cream into the flour mixture until just moistened.
Turn out dough on a floured work surface. Gently lift and fold dough four or five times, making a quarter turn between each fold. Place dough on the cookie sheet forming it into an 8-inch square, approximately 1 inch thick. Using a floured pizza cutter or knife, cut 12 to 16 squares in dough, leaving biscuits intact. 

Bake in upper half of oven for 22-25 minutes. until golden brown. Cut through or pull apart biscuits.

*The Ginger People make baker’s cut crystallized ginger chips, which are perfect for baking recipes (as well as to put in oatmeal, granola, etc). This is what they look like, although they are significantly cheaper (by half) at Cost Plus.

Saturday, May 26, 2012

Going Whole Hog


Well, not really WHOLE hog, just the belly of the beast. Yep, last week we cured, rendered, smoked or ate 20 pounds of pork belly. Now before you get on your high horse about how unhealthy that is, let me tell you that it wasn’t all consumed in one sitting. But I have found that when I am doing anything homemade, more is better. Like canning. Why make 5 jars of jam, when 10 jars are just as easy. Same thing with the belly.

It all began because we ran out of our home-cured bacon. Bacon that we not only enjoyed as a breakfast item, and in soups and other savory dishes, but also in bacon fat caramels. (More about that later.) So it was time to rub some belly and get the smoker out. And because we donated homemade bacon (and a box of those delish bacon caramels) to a fundraiser, more was required. We also share the bounty with Brilliant Daughter and Electrician Son.

So, two 10-pound pork bellies made their way to my kitchen. I cut the choicest 5-pound slab for my first foray into pancetta, for which I will dedicate a whole post to next week. Then I cut four slabs for bacon, and had one small slab leftover that I slow-roasted.

I wrote a post about “Makin Bacon” last year, when we first started making our own. We have since graduated from a repurposed Weber to an electric smoker that belonged to my godfather and is probably 15 years old. It takes a bit less tending and has 3 racks, making the smoking process more efficient and the end result is just as good.

As for the slow-roasted pork belly, I can tell you it’s not for everybody. Butcher Son’s girlfriend doesn’t like fat, and there is definitely a good amount on a belly, so we made it on a night when she wasn’t sitting at the dinner table.

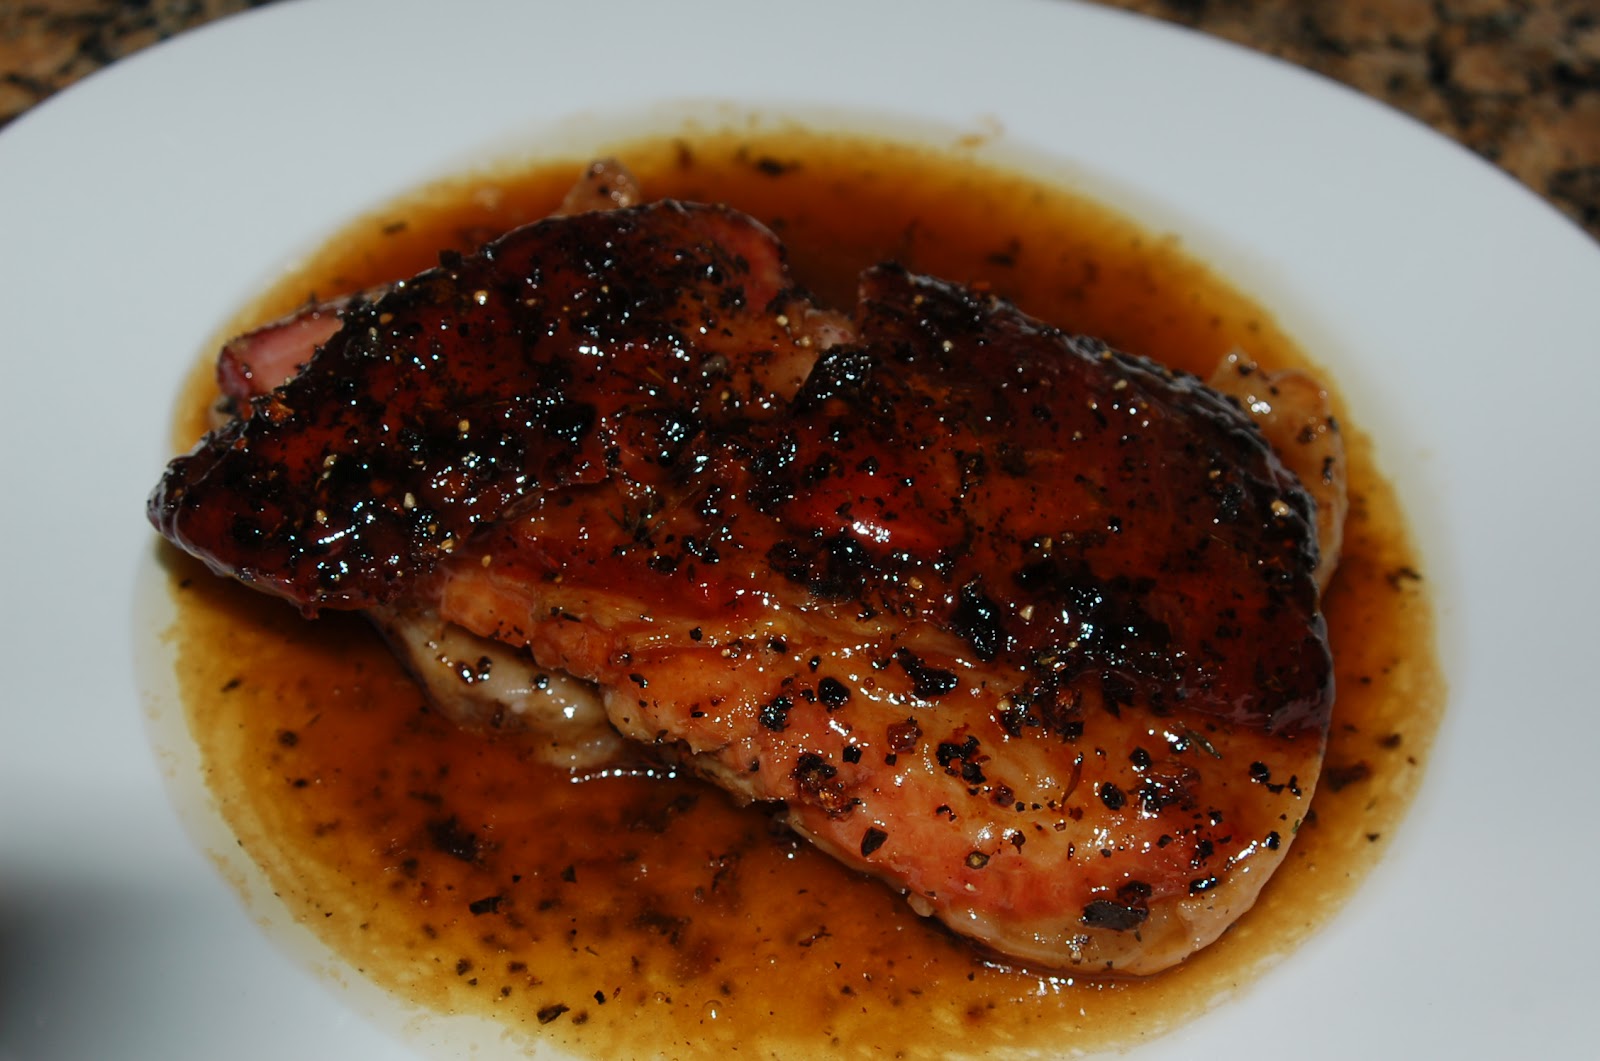
The slow roasting, with nothing more than a few herbs and a finishing glaze, completely changes the texture of the fat. It just melts in your mouth. One caution: you cannot eat much of this and a small 1.5 pound slab feeds 6 easily. It also needs to be served with a starch, like rice, couscous, polenta, potato.

While it takes a significant amount of time to roast pork belly, it is so worth it, and requires no tending. You rub it up, stick it in the oven and voila! Topped with a Makers Mark bourbon glaze and you have one delicious serving of heart-clogging proportions.

I found the recipe on the Maker’s Mark site, which encourages cooking with bourbon, obviously. But the glaze added just the right amount of flavor and complemented the pork perfectly. 


So next time you are feeling adventurous, stop by your local butcher (there is a really cute one at Robert’s of Woodside!), and pick up some pork belly for dinner.

Slow Roasted Pork Belly

1/2 cup Maker’s Mark® Bourbon
2 pounds pork belly, skin on
1 tablespoon kosher salt
1 teaspoon freshly ground white pepper
1 tablespoon fresh sage, minced
1 tablespoon fresh thyme, minced
2 tablespoons garlic, crushed and minced
1/4 cup honey
2 tablespoons sherry or apple cider vinegar
2 tablespoons butter
2 teaspoons kosher salt
1 teaspoon cracked black pepper

Preheat oven to 275°F. Using a sharp knife score the skin of the pork belly in a checkerboard design.

In a bowl combine the salt, pepper, sage, thyme and garlic. Rub the pork belly on both sides with mixture until evenly coated. Place pork belly in a roasting pan skin side up. Place in the oven and bake for 3-1/2 hours, turn oven to broil and cook for 10-12 minutes until the skin puffs up evenly. Remove from oven and let rest for 30-40 minutes at room temperature.

Using a serrated knife, cut the meat into 1/2-inch-thick pieces and reserve.

Place the honey, Maker’s Mark® Bourbon, vinegar, butter, salt and pepper in a large sauté pan. Place over medium high heat and reduce by a third. Place the pieces of crispy pork belly in the pan and increase to high heat. Cook until syrupy and glazes the pork belly. Remove from heat and keep warm.

Plate the meat, drizzling the remaining sauce atop and on the plate.

Tuesday, May 22, 2012

Strawberry-Lemonade Babycakes


I’m a fanatic when it comes to cupcakes. The reason being that I cannot make a layer cake. Well, I can make the cake, but it never lays flat and the frosting never looks like the magazine or cookbook picture. In fact, they end up looking like a five-year-old made them. So I gave up long ago and switched to cupcakes, which are easier to share with others anyway.

My latest creation is a strawberry-lemonade cupcake, which I made for a baby shower, and appropriately called “Babycakes.” These little mini-cupcakes are bold in flavor, not too sweet, and adorable as all get-out.

The idea was born out of the fact that the impending arrival will be a girl and I wanted pink cupcakes. Not just tinted white cupcakes, but something pink in flavor. And because my new favorite frosting is lemon meringue, I paired the lemon with strawberry for a refreshing spring-like melding of flavors.

I started with a box mix for strawberry cake. Now I know some of you may be purists and make your cake from scratch—and I do, too, sometimes—but cake mixes are quick, easy and have a good consistency for the small cupcakes. I buy the box mixes on sale for under $1, which leaves no guilt when I want to try out mixing in different flavors.  But, I digress…..

I started with the box mix, which required oil, eggs and water. I substituted ½ cup frozen lemonade for ½ cup of the water and added in an additional tablespoon of strawberry extract, as I wanted the flavor to pop and not be overwhelmed by lemon. The mix made 48 mini cupcakes and three 4-inch layers (one for tasting and two to make a daddy-to-be cake—which turned out slightly better than a five-year-old’s attempt).

Once the cupcakes had cooled I piped homemade lemon curd into the centers for a surprise treat. Because I have two lemon trees, I regularly can lemon curd. You can, of course, skip this step or use store-bought.

Then I made the lemon meringue frosting. (Recipe here.)  What I like about the frosting is that it only takes ¾ cup of sugar, is very light, holds up to piping or creative decorating with the back of a spoon, and tastes divine. Much better than a cream cheese-based or buttercream frosting. I even added a little pink gel color to match the cupcakes and piped it on with a star tip.

To top off the little gems, I used miniature rattles, safety pins and pacifiers. If you would prefer, you can buy miniature candy ducks or other edible decoration and avoid the hassle and waste of the plastic versions. But they just looked so darn cute. And, they tasted great.  


Monday, April 23, 2012

And Baby Makes Three: Assembling a Food Hamper for the New Family


I’ve been inspired by the spate of babies due this Spring. Primarily it is the crafty part of me that has been at work, learning new patterns for baby blankets and designing some very cute felt and fleece monsters. While I was clearly on track to finish the latest blanket and have a coterie of homemade stuffed monsters for the two due in May, Mother Nature clearly had other plans. Friday the first of the babies arrived, almost four weeks early, and the blanket intended for the wee one is just not ready yet. In fact, it probably won’t be done until the original due date of May 17th. But I still found a way to celebrate the blessed event by providing a food hamper for the new parents, friends of Butcher Son.

Upon hearing the news that the mother-to-be was in labor, my mind raced. Knowing I could not knit fast enough to finish the blanket, I went into full-on chef mode. I sketched out meals, and on Saturday went shopping. Starting Saturday night and working all Sunday morning, I was able to cook several meals for the happy little family, and pack them up in a hamper to be delivered. One thing new parents don’t need to worry about is trips to the grocery store or standing in front of a stove. And who wants to eat microwaved food or take-out every meal? There’s nothing like a home-cooked meal, filled with love and goodness to keep up the energy a new baby requires.

The weather here is vacillating between hot and cold, so I made sure the meals could accommodate both. There is banana bread and yogurt parfaits for breakfast, some quinoa salad for lunch, a creamy French lentil soup and Rocky Mountain brisket and pasta salad for dinner. I also baked a batch of triple ginger cookies and boxed up some of my super tasty bacon caramels for a sweet treat. I also threw in a dog chew for the puppy, so he is not left out, as well as a mini-bottle of champagne for mom and a bottle of Jameson for dad (in honor of the new baby’s name). And peeking out amongst it all are three of my new best friends, soft stuffed monster mates.

I utilized canning jars for much of the food, as the quart jars contain enough for two. I labeled everything, not so much to be cute, but more in the interest of allowing them to avoid anything they may be allergic or sensitive to. The food itself is pretty healthy, with grains, vegetables, and fruit predominant. The parfaits are made from Greek yogurt and fresh berries, providing protein, calcium, vitamins and antioxidants. The banana bread provides some B6 and potassium (not to mention tasty mini chocolate chips!).

Quinoa, an ancient grain that is hitting mainstream markets, is high in fiber, has about 15% protein, and 9 essential amino acids. Paired with a healthy serving of avocado, I add in ponzu, sesame oil and a dab of sriracha, making it a tasty main or side dish. The pasta salad, made with whole wheat pasta, has carrots, celery, zucchini and olives, along with a balsamic dressing, meaning fiber and vitamins packed into that jar. The base of the soup is lentils, which are high in protein and iron. It also contains onion, garlic, carrot, celery, tomatoes, all good vegetables, plus a dose of cream (some good fats are required to help mom with milk production).

The Rocky Mountain Brisket is a lean cut of beef, slow cooked in the oven, sliced and topped with my homemade barbeque sauce. I really made this dish for dad—hearty and flavorful. And who doesn’t like a BBQ beef sandwich?

The triple ginger cookies contain three kinds of ginger, good for settling stomachs and quelling a sweet tooth. Made with molasses, raw ginger, ginger powder and crystallized ginger, these soft rounds are a family favorite and pack easily without breaking. The bacon caramels were made a few days before, with the fat from our home-cured bacon. They have garnered rave reviews from everyone who has tried them and they deserve to be shared with everyone, especially new parents.

The Brady Bunch sends the hamper with heartfelt congratulations to Meghan, Chris, and their new son Jameson.

(NOTE: The cute little stuffed monsters will be featured on Crafting Suburbia in an upcoming post)


Monday, April 16, 2012

Party Planning: Untraditional Wedding


So Brilliant Daughter has friends who underwent an amalgamation (euphemism for wedding) last weekend. In a very non-traditional gathering, family came to town for what was ostensibly an engagement party. They holed up at the gorgeous CordeValle Country Club in San Martin, and the blended families spent two days enjoying a slew of events. From a hands-on dinner party with a local chef to a morning sojourn to Point Lobos, the beautiful couple capped off their time together with what they called a “ceremonial amalgamation.”

Because the wedding was to be a surprise for their families, and due to work constraints, Brilliant Daughter and I pitched in to help make the weekend less stressful, by preparing food and the welcome packet. (See this post on Crafting Suburbia for the printed welcome packets.)

Saturday, the official amalgamation day, started off with a drive to Point Lobos on the California Coast. There was a hike in to a knoll at Whaler’s Cove, where all enjoyed a picnic lunch—which is where we came in. Given that there are 18 people, and we needed to keep things to 3 backpacks, we tried to think creatively. We packaged bags of trail mix for the walk itself, and Parisian walking sandwiches, gazpacho, and mini fruit crisps baked into 4-ounce canning jars and topped with an oatmeal mixture.

Once the families returned to CordeValle, and after a brief respite, they made their way up a short trail to a yoga deck overlooking the foothills and the golf course; a beautiful outdoor setting that seemed perfect for this active couple. Amongst loved ones, and with the help of a minister-friend, they officially joined their families with personalized vows and a kiss to seal the deal.

Upon returning to their luxurious fairway homes, they celebrated with champagne and chocolate truffles. (In lieu of a traditional wedding cake, we made champagne truffles, boxed up in pairs of two, and wrapped in special Just Married bands, found at the most adorable store in the Cedros Avenue Design District in Solano Beach.)

To get ready for the event, the last week has been spent in the kitchen preparing all the yummy goods. I started on Tuesday, mixing and packaging the trail mix. Eighteen clear bags, tied with twine and a personalized label. Walnuts, sunflower seeds, cashews, coconut and dried fruit should sustain the families during their hike.

Wednesday I made the batch of dark chocolate champagne truffles, which are rolled in cocoa powder, nestled into purple paper cups and placed side by side into ballotins. A purple ribbon overlaid with the Just Married bands (originally intended to make a daisy chain) enclosed the sweet treats and keep them safe. 

I also decided to provide a bonus treat for arrival day. Using my nanny’s shortbread recipe, I zested and juiced two of my Meyer lemons to add in, and rolled the dough out. Cut into various sized heart shapes, some with a cushion design, they are simple and tasty—perfect for a cup of tea, a cappuccino from the couples’ famed “Miss Sylvia,” or even a glass of wine.

Thursday was spent making gazpacho. This is a fresh and lively soup, full of multiple types of vegetables and healthy ingredients, and makes a great picnic item. We had originally intended for the gazpacho to be put in 8-ounce canning jars, but felt that 18 canning jars in a backpack was an accident waiting to happen. Instead, we poured the soup into a large-mouth plastic container with screw top, and provided plastic cups. Lighter in weight and less bulky.

Friday morning was the last push. Bringing home fresh baguettes from our favorite bakery, Pamplamousse, I assembled Parisian walking sandwiches. Fresh mozzarella and pesto (some with prosciutto, some with homemade sundried tomatoes) and dry coppa with Emmenthaler. Bound in parchment, we slipped them into plastic sleeves, twisted the top close and sealed with twine and label. 

The fruit crisps also got made. Pear/blueberry (with a touch of crystallized ginger) and apple/dried cranberry, topped with a cinnamon-cardamom infused oatmeal mixture and cooked in 4-ounce canning jars, which were sealed and got the same twine/label treatment.


Both Brilliant Daughter and I were honored and grateful that we could help make this special family weekend a little easier on our friends. It gave me a chance to keep busy, test some new recipes, and let the creative juices flow a little bit. We wish them nothing but the best in life and love.

Recipes on Page 2

Saturday, April 14, 2012

5-Minute Artisan Bread


I don’t eat bread on a regular basis, and in fact I may only eat sliced bread (or bagels or English muffins, for that matter) once every two weeks. The only exception is a good hearty wheat bread or an artisan loaf that has some heft and flavor to it. Being from the Bay Area, sourdough is a longtime favorite, but we have also been fortunate to have some very creative bakers in the region that put out flavorful artisan breads, with a good crust and crumb. I am often tempted to eat a loaf by myself, which is saying a lot.

The best bread is that which comes right out of the oven—warm and fragrant and flavorful, without need for butter or other accompaniments. For over 30 years I have attempted to make my own breads, something my Granny did on a regular basis. In fact, once she bought me a bread machine thinking that would help me along, but I quickly found the device useless, and the shape less than optimal. Given limited storage space, it didn’t last long in my household.

I’ve even invested money in cookbooks to further my cause: most recently Peter Reinhart’s Artisan Breads Every Day. But I have yet to fully embrace a recipe that I want to make weekly. Until now…..

I have never, and I mean NEVER, encountered a recipe that I like so much for a bread. It combines all the requirements of a suburban cook: very little time, very few ingredients, and a delicious product.

The process is super simple and requires NO KNEADING. In fact, it really only takes 5 minutes of active hands-on time. Truly…..

In a nutshell, you mix your 4 ingredients for a minute or two, leave them in the bowl overnight, heat up a pan, throw it in, and Voila!, 45 minutes later you have a crusty artisan bread, reminiscent of the $4 loaves you find in the market.

Although the timing and the taste are the most significant attributes of this recipe, there is an added bonus. It lends itself to a variety of flavors. Want a raisin-walnut-cinnamon bread for breakfast? No problem. Herb bread for that pot of minestrone? Can do. A cheesy-sundried tomato bread to accompany pasta? Easy peasy.

Other than the 4 ingredients, the only other thing you truly need is a cast iron enameled pan. I have one cheap version from Home Goods ($29.95) and one fancy Le Crueset ($199). Because I double the recipe—every time—I use both. And they work equally well. The shape of the pan doesn’t matter—it can be a round pan or an oval one. (Skillets are too shallow, however.) I’m thinking that a plain cast iron Dutch oven might also work as well, although I do not have one to experiment with.

So, go ahead and give it a try. Don’t be intimidated. I promise that you won’t be disappointed.

5-Minute Artisan Loaf

3 cups unbleached all purpose flour
1 3/4 teaspoons salt
1/2 teaspoon yeast
1 1/2 cups lukewarm water

In a large mixing bowl, whisk together flour, salt and yeast.  Add water and mix with a wooden spoon until a shaggy mixture forms.  Cover the bowl tightly with plastic wrap and set aside for 12 to 18 hours.  (I usually start this after dinner or before bedtime to make the next day.)

Heat oven to 450 degrees.  When the oven has reached 450 degrees place a cast iron pot with a lid in the oven and heat the pot for 30 minutes.  Meanwhile, pour dough onto a heavily floured surface and shape into a ball.  Cover with plastic wrap and let set while the pot is heating. 

Remove hot pot from the oven and drop in the dough. Cover and return to the oven for 30 minutes.  Remove the lid and bake an additional 15 minutes.  Take bread from the oven and place on a cooling rack to cool.

Flavoring Suggestions:
Raisin-walnut-cinnamon, rosemary-lemon-Gruyere, lemon zest-thyme-Asiago, mixed fresh herbs (your choice), sun-dried tomato with shredded mozzerella, pesto….the combinations are limitless.